Getting started
Getting started
In this document you will find all necessary information about setting up your development environment and application.
This consists of several steps:
- AVAplace account creation/registration on a desired environment(s)
- Application registration and development environment setup
- Setting up application configuration in the application project
- Setting up package feed to obtain all necessary packages for front-end and back-end functionality
Environments:
There are several development environments
- https://avaplace.com: Production environment
- https://beta.avaplace.com: Prerelease environment
- https://alpha.avaplace.com: Development and testing environment
Initialize your user accounts
- Registration on AVAplace demo stage
- Anonymously or by invitation (you must contact the tenant's administrator)
- Wait for completed registration process
Register your application into DevOps and start development
You need Product manager role to this.
On "Management" / "Store editor" page make your application registration.
- Open DevOps application on https://demo.avaplace.com and switch into "Management" > "Store editor"
- Make your application registration
- If you have an account with access to multiple different tenants - make sure that the correct tenant of the application manufacturer is used to register the application.
- Click Save draft button to persist your application.
- Click Release button to confirm your application and create GIT repository for you.
- This process take a few minutes, please be patient.
- In DevOps application switch into "Development" > "Applications" and search your new application.
- Switch to GIT tab and click Generate access token button.
- This is needed only for the first time and again when your token expires (lifetime for GIT token is 6 months)
- Remember generated token and user name showed in dialog.
- Open your installed developer tools.
- Clone git repository from URL which you see on GIT tab in DevOps application.
- Use User name from point 2.
- Use Token from point 6. as your git password.
- Git checkout develop branch and pull latest changes.
- The next step is in the readme.md file inside git.
- To start development, follow the steps in the readme.md file generated on your application GIT repository.
Example secrets.json for local development
Example:
{
  "ConnectionStrings": {
    "AppDbConnectionString": "Your localhost database server connection string."
  },
  "SsoAuth": {
    "Authority": "https://alpha.avaplace.com/api/asol/idp",
    "ClientId": "Your Client Id for alpha.avaplace.com",
    "ClientSecret": "Your Client Secret for alpha.avaplace.com"
  },
  "Messaging": {
    "RabbitMq": {
      "HostName": "localhost",
      "UserName": "guest for localhost RabbitMQ",
      "Password": "guest for localhost RabbitMQ",
    }
  }
}
Backend architecture overview
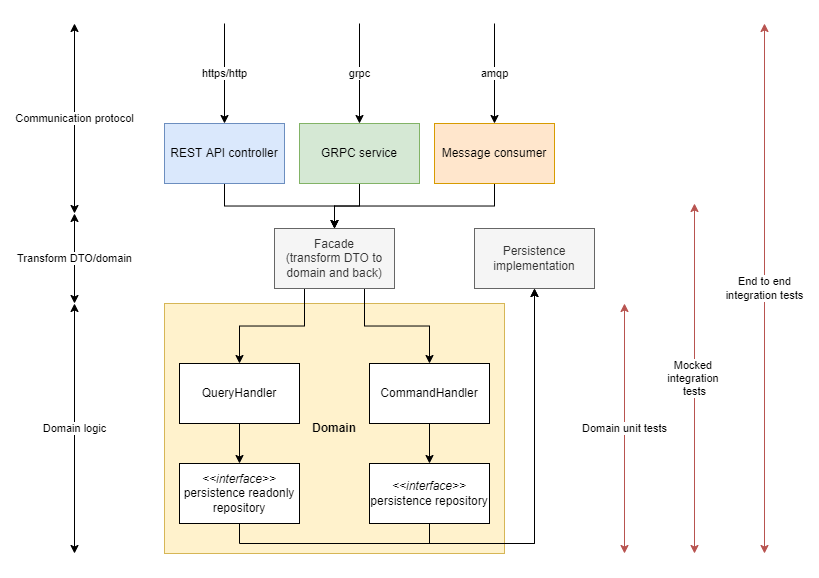
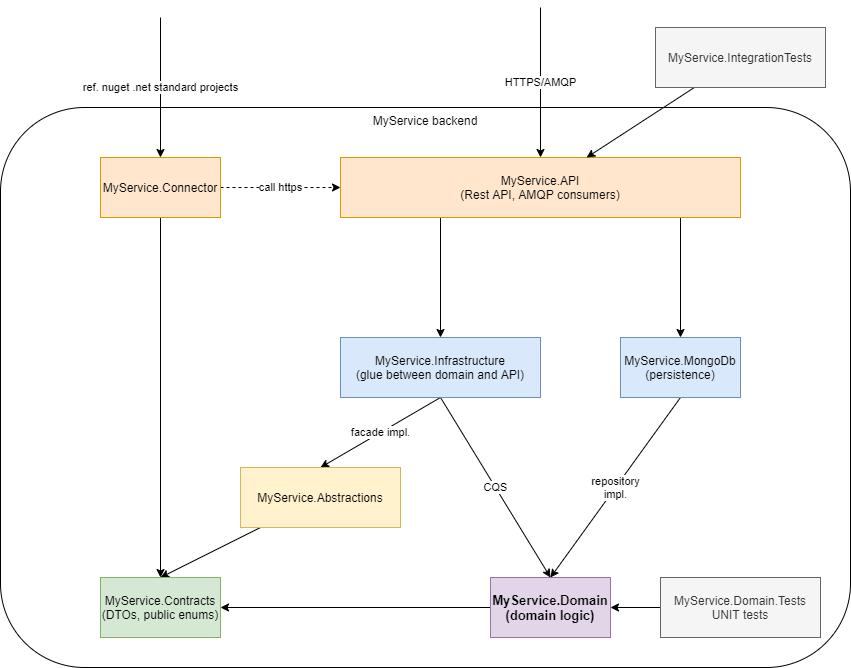
Backend native application solution clean architecture
Nuget and NPM feeds
Once your application - project is ready for development, you will need packages/libraries which will provide a necessary functionality for your application.
These are available at:
- AVAplace PUBLIC feed for NuGet packages: https://pkgs.dev.azure.com/avaspace/feed/_packaging/feed/nuget/v3/index.json
- AVAplace PUBLIC feed for npm packages: https://pkgs.dev.azure.com/avaspace/feed/_packaging/feed/npm/registry/