Prepare pipelines inside repository
Overview
To deploy the application into AVA development or production environment, the application must first be built in partner's Azure DevOps organization and subsequently published to container registry.
AVAApps repository should be created at the same time when project is created. If not, create it manually. This repo stores templates of pipelines.
Pipeline setups
Now we switch to application repository, where we create three yaml files for pipelines, under pipelines directory.
Build pipeline
Build pipeline builds application and store it in container registry in AWS (Amazon Web Services).
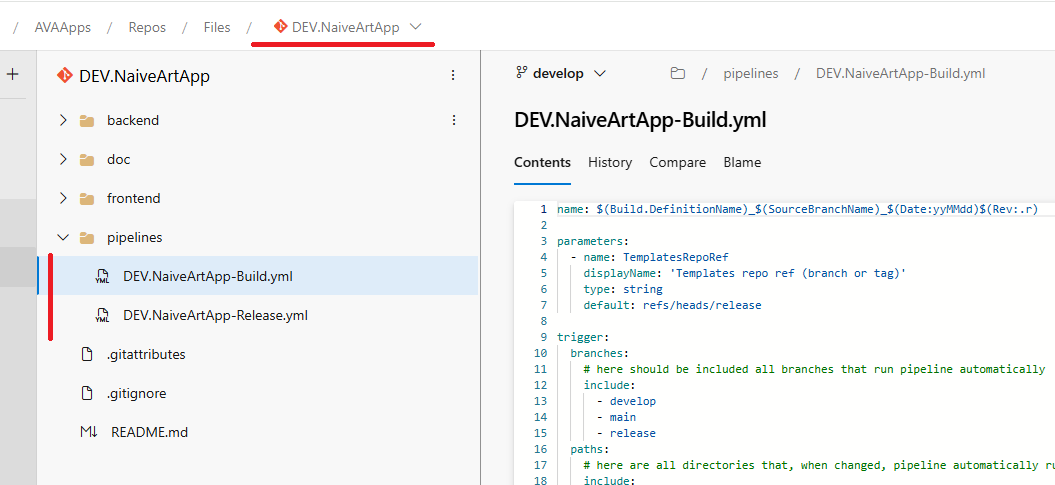
File should follow the naming pattern NameOfRepository-Build.yml.
Copy pipeline content from example list below into /pipelines folder of the application repository and edit it according your settings, especially ApiName and ApiProjectRelativePath parameters.
Pipeline should be copied to both 2 branches, in develop as well as in release.
/pipelines/NameOfRepository-Build.yml
name: $(Build.DefinitionName)_$(SourceBranchName)_$(Date:yyMMdd)$(Rev:.r)

trigger:
  branches:
    # here should be included all branches that run pipeline automatically
    include:
      - develop
      - release
  paths:
    # here are all directories that, when changed, pipeline automatically runs
    include:
      - backend/*
      - frontend/*

resources:
  repositories:
    - repository: templates-repo
      type: git
      name: AVAApps/AVAApps
      ref: refs/heads/release

stages:
  - template: pipelines/templates/stages-build.yaml@templates-repo
    parameters:
      # Name of application directory below backend folder
      # E.g., ASOLEU_DEV.NaiveArtApp.API
      ApiName: 'ASOLEU_DEV.NaiveArtApp.API'
      # Path to application .csproj file
      # E.g., backend/ASOLEU-DEV.NaiveArtApp.API/ASOLEU-DEV.NaiveArtApp.API.csproj
      ApiProjectRelativePath: 'backend/<ApiName parameter as specified above>/<ApiName parameter as specified above>.csproj'
      # Parameter enables/disables backend build
      BuildAndPublishBackend: true
      # Parameter enables/disables frontend build
      BuildAndPublishFrontend: true
      # Selected .NET version for build
      DotNetVersion: '8.0'
      # Frontend's url suffix, specific for application
      FrontendBasePath: '/apps/asoleu-dev/naiveartapp'
      # Sets path to NuGet.config in repository
      NugetConfigPath: 'backend/NuGet.config'
Tests run only in the Check pipeline.
RunUnitTests,RunIntegrationTests,BackendUnitTestProjectsandBackendIntegrationTestProjectsbelong tostages-check.yaml; passing them tostages-build.yamlfails template expansion.
The parameters section of the pipeline is used to define parameters essential for building the application.
Release pipeline setup
The purpose of release pipeline is to deploy application from container registry to AVAplace cloud.
The file for release pipeline follows the naming pattern NameOfRepository-Release.yml.
Copy release pipeline from example listed below into the /pipelines folder of the application repository and edit it according your settings, especially resources/pipelines/source variable.
This pipeline should be also copied to both 2 branches, develop as well as to release.
/pipelines/NameOfRepository-Release.yml
name: $(Build.DefinitionName)_$(Build.SourceBranchName)_$(Date:yyMMdd)$(Rev:.r)

trigger: none

resources:
  pipelines:
    - pipeline: build_artifact
      source: NameOfRepository-Build
      trigger:
        branches:
          include:
            - develop
            - main
            - release
  repositories:
    - repository: templates-repo
      type: git
      name: AVAApps/AVAApps
      ref: refs/heads/release

stages:
  - template: pipelines/templates/stages-release.yaml@templates-repo
    parameters:
      # This parameter enables/disables backend deployment
      BuildAndPublishBackend: true
      # This parameter enables/disables frontend deployment
      BuildAndPublishFrontend: true
Result pipeline setup
The purpose of result pipeline is to show result of the application's deployment from AVAplace cloud.
The file follows the naming pattern NameOfRepository-Result.yml.
Copy result pipeline from example listed below into the /pipelines folder of the application repository and edit it according your settings, especially substitute jobs/parameters field with resouces/webhooks/webhook value.
Also This pipeline should be copied to both 2 branches, develop as well as to release.
/pipelines/NameOfRepository-Result.yml
trigger: none

resources:
  webhooks:
    # This value is obtained from Asseco Solutions, described in documentation
    # specifically in part Prepare Azure DevOps to build application / step Create Incoming webhook service connection for result pipeline
    # Please substitute this value also in parameters' area at the end of this file
    - webhook: OrganizationNameOfRepositoryWebhookResult
      # The second value from the same place
      connection: OrganizationNameOfRepositoryServiceResult
  repositories:
    - repository: templates-repo
      type: git
      name: AVAApps/AVAApps
      ref: refs/heads/release

jobs:
  - template: pipelines/templates/jobs-release-result.yaml@templates-repo
    parameters:
      Name: ${{ parameters.OrganizationNameOfRepositoryWebhookResult.name }}
      Namespace: ${{ parameters.OrganizationNameOfRepositoryWebhookResult.namespace }}
      Updated: ${{ parameters.OrganizationNameOfRepositoryWebhookResult.updated }}
      Status: ${{ parameters.OrganizationNameOfRepositoryWebhookResult.status }}
      AppVersion: ${{ parameters.OrganizationNameOfRepositoryWebhookResult.app_version }}
When all pipelines are in the repository, let's continue with step Build application and publish it to container registry.